Hi, Today I will be talking about the SQL Server Import and Export Wizard, which is one of the easiest ways to develop your first SQL Server Integration Services (SSIS) package, and it so useful to export and import data from multiple sources to a various destinations, varies from relational database tables to text files.
Through the demo I will be using SQL Server 2012 on top of a Windows 2008 Sever, but the wizard is exactly the same as it was in erlier versions.
You start by learning the different ways to get the wizard up, and it is straight forward and can be launched from various locations
1-from the run commend or the command prompt, you might type "DTSWizard.exe" and hit enter, which will get the wizard up and running..

2-By right click on your database---> Tasks--->"Import Data" or "Export Data"

3-From SQL Server Data Tools (SSDT) , right click on "SSIS Packages" and select "SSIS Import and Export Wizard"

4-From the start menu, navigate to "Microsoft SQL Server 2012" and select the "Import and Export Data" of your windows version 32 Bit /Vs 64 Bit"

The Wizard...
Once the wizard is up, you'll be welcomed with the following screen, unless you click on "Do not show this starting page again", so any subsequent runs this screen will not appear.

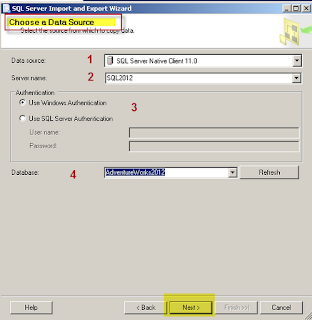
Press on next and you'll be prompted with the Data Source, which could be any data source you need to pull information from. such as Database table, excel file, flat files (Text File) or a delimited file.
I will be using my local SQL server engine to pull information from, specifically from the "Adventureworks Database".
Next, you will need to specify your destination. Here I will be saving the table's data to an Excel file

Or a flat file (Text file)

Next, you might let the wizard guide you through your tables or views, or write your ready query to pull your desired information.

I choose the first option and here is the screen to select which table or a view I need to pull information from.
You could click on "Preview" to check your data, or "Edit Mapping" to map only the desired column to an output in your text file.

Next would prompt you to "Run Immediately" the package, or save it for future use or edit.
I will select all the options, since I need to run it and save it for later use, i will be saving the package in the MSDB database, you could use the file system if that is what you are looking for.


Clicking on finish SOMETIMES turns to be successful and displays the following screenshot.
Otherwise, it will tell you what happened wrong and you will have the option to go back to fix it.

Checking the file existence, and voila! it has been created.

Connecting to the SSIS for checking on the package if it was saved as promised or not, and voila!! it was saved, now you might edit it, run it or schedule it to run at your desired interval using the "SQL Server Agent"
 Hope that helps someone, and please let me know if it wasn't clear enough.
For more info about the wizard, please check http://msdn.microsoft.com/en-us/library/ms141209.aspx
Through the demo I will be using SQL Server 2012 on top of a Windows 2008 Sever, but the wizard is exactly the same as it was in erlier versions.
You start by learning the different ways to get the wizard up, and it is straight forward and can be launched from various locations
1-from the run commend or the command prompt, you might type "DTSWizard.exe" and hit enter, which will get the wizard up and running..


4-From the start menu, navigate to "Microsoft SQL Server 2012" and select the "Import and Export Data" of your windows version 32 Bit /Vs 64 Bit"

The Wizard...
Once the wizard is up, you'll be welcomed with the following screen, unless you click on "Do not show this starting page again", so any subsequent runs this screen will not appear.

Press on next and you'll be prompted with the Data Source, which could be any data source you need to pull information from. such as Database table, excel file, flat files (Text File) or a delimited file.
I will be using my local SQL server engine to pull information from, specifically from the "Adventureworks Database".

Next, you will need to specify your destination. Here I will be saving the table's data to an Excel file

Or a flat file (Text file)

Next, you might let the wizard guide you through your tables or views, or write your ready query to pull your desired information.

I choose the first option and here is the screen to select which table or a view I need to pull information from.
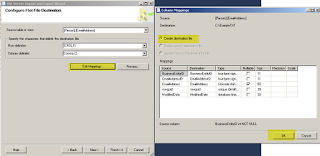
You could click on "Preview" to check your data, or "Edit Mapping" to map only the desired column to an output in your text file.

Clicking on Edit Mapping would give you the following screen shot.

I will select all the options, since I need to run it and save it for later use, i will be saving the package in the MSDB database, you could use the file system if that is what you are looking for.

Next the wizard will display a confirmation summary.

Clicking on finish SOMETIMES turns to be successful and displays the following screenshot.
Otherwise, it will tell you what happened wrong and you will have the option to go back to fix it.

Checking the file existence, and voila! it has been created.

Connecting to the SSIS for checking on the package if it was saved as promised or not, and voila!! it was saved, now you might edit it, run it or schedule it to run at your desired interval using the "SQL Server Agent"
For more info about the wizard, please check http://msdn.microsoft.com/en-us/library/ms141209.aspx
No comments:
Post a Comment